At Thomas Group Printing, we believe in delivering print jobs that reflect every intricate detail envisioned by our clients. One of the key aspects to ensuring precision and satisfaction is having the right fonts display and print as intended in your design documents. In a previous blog post, we discussed outlining fonts to prevent undesired font substitution. However, embedding fonts is our preferred method as it allows for necessary tweaks in the document if needed. In this guide, we will delve into how you can embed fonts in Adobe InDesign, Illustrator, Photoshop, and PDF files, ensuring a hassle-free printing experience.
Why Embed Fonts?
Embedding fonts in your design files is a surefire way to preserve the font styles you’ve meticulously chosen for your project. Unlike outlining, embedding fonts preserves all text formatting, making it a preferred choice for long documents like booklets or magazines that may have bulleted lists, underlines or numbering. By embedding fonts, you’re ensuring that your printer sees the document exactly as you designed it, even if they don’t have your custom fonts installed.
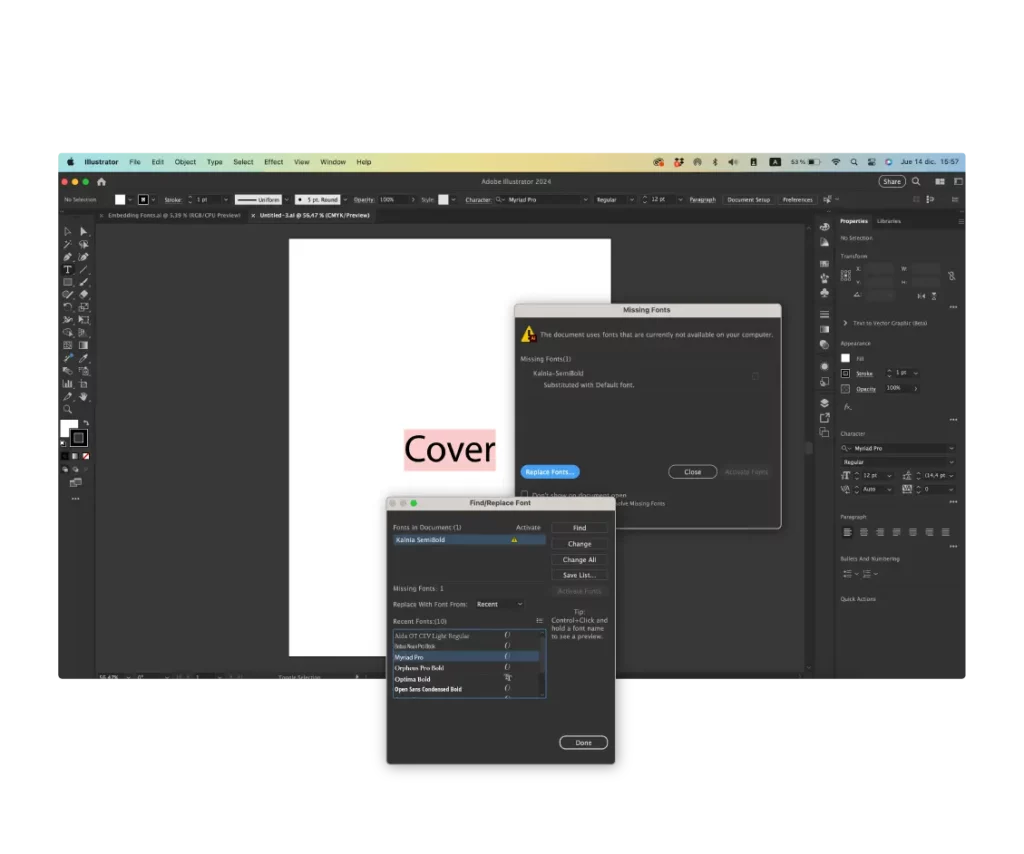
How do you embed fonts? It depends on the file format.
When it comes to embedding fonts, most professional design software will do the heavy lifting for you.
Exporting to PDF embeds fonts by default
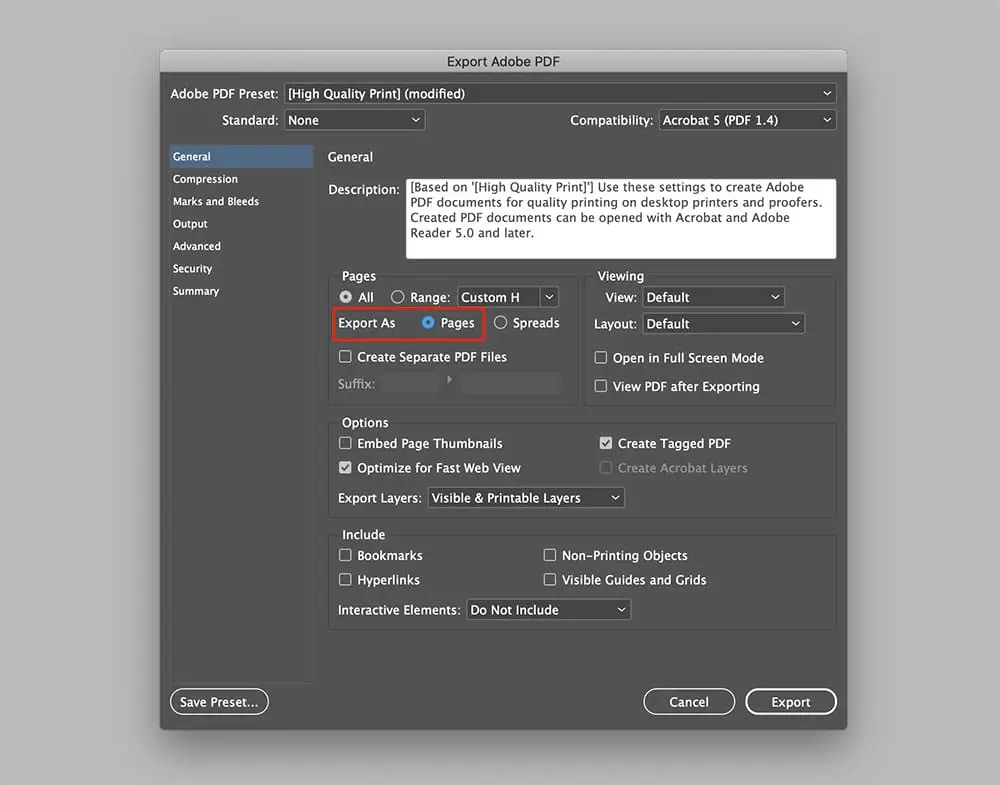
If you’re exporting as a high-res PDF using the PDF for Print preset in Adobe InDesign or Illustrator (Thomas Group’s preferred way of receiving files) any fonts included in the document are typically embedded in the PDF. If you’d like to double check that your fonts were actually embedded in your PDF, we’ll share a handy way to check. (More on that later in this post)
Exporting PDF for Font Perfection
Exporting your design to PDF? Don’t forget to embed those fonts. It’s a straightforward process:
InDesign: Click on the File menu, choose Export, and opt for Adobe PDF Print format.
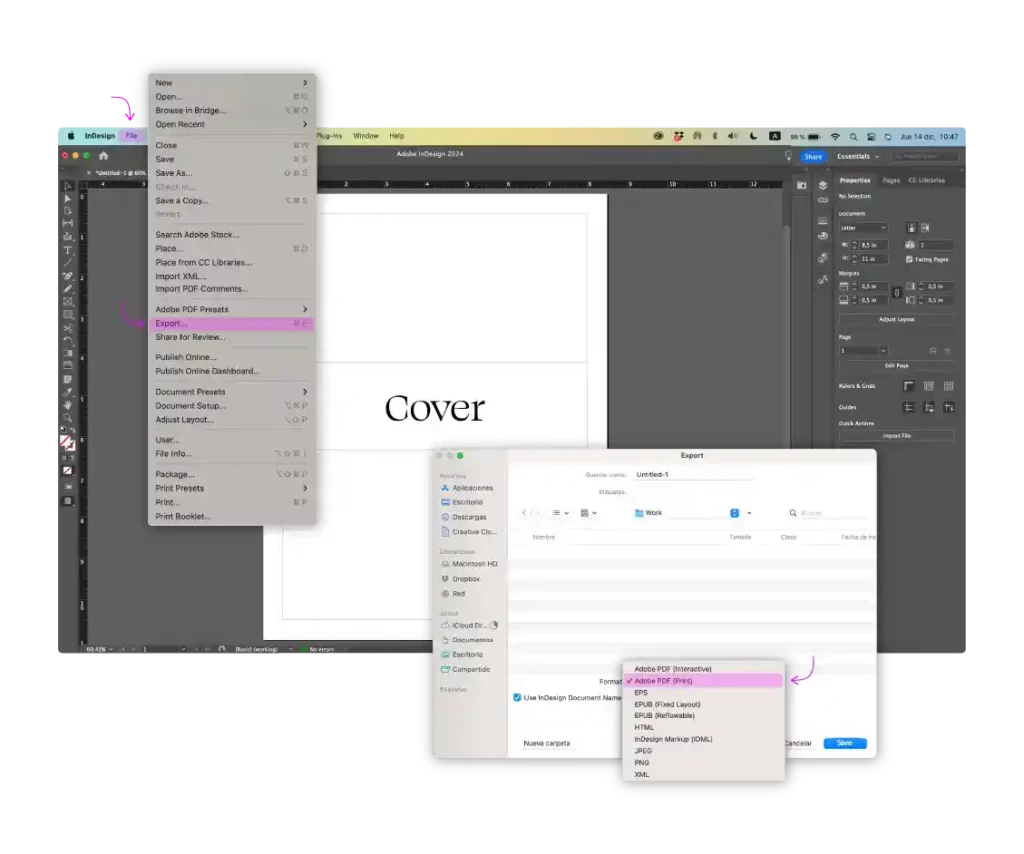
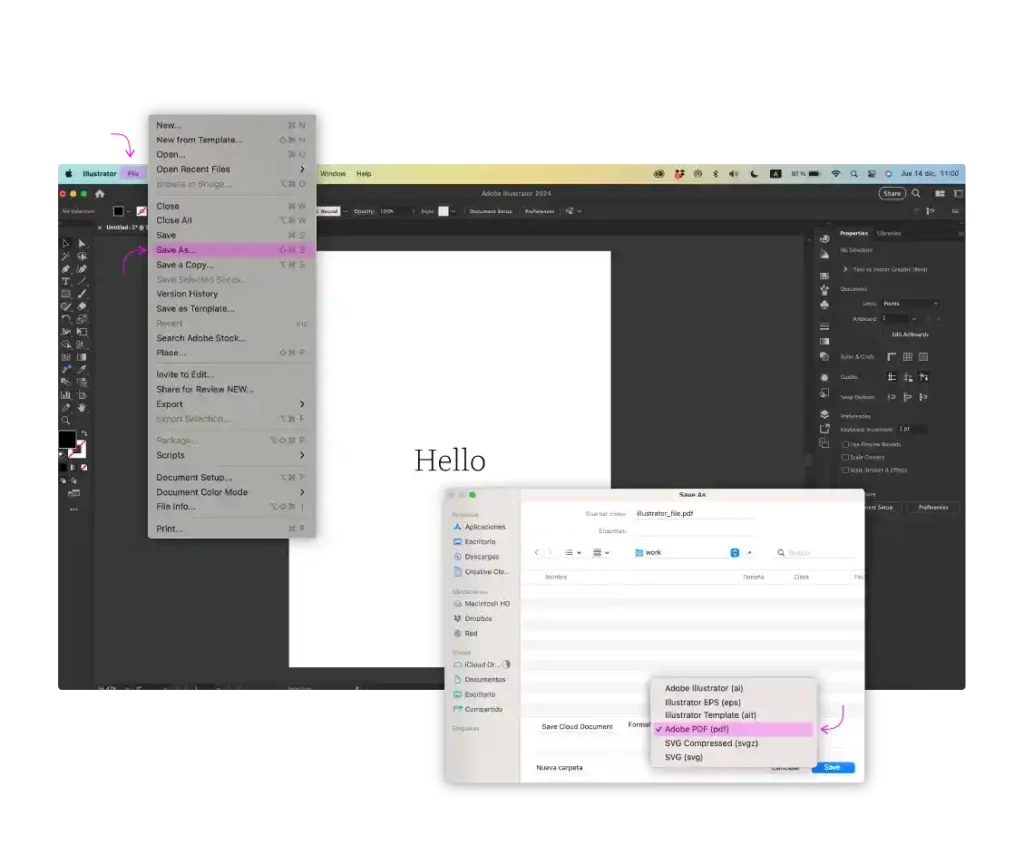
Illustrator: Navigate to the File menu, select Save As, and choose Adobe PDF as the format.
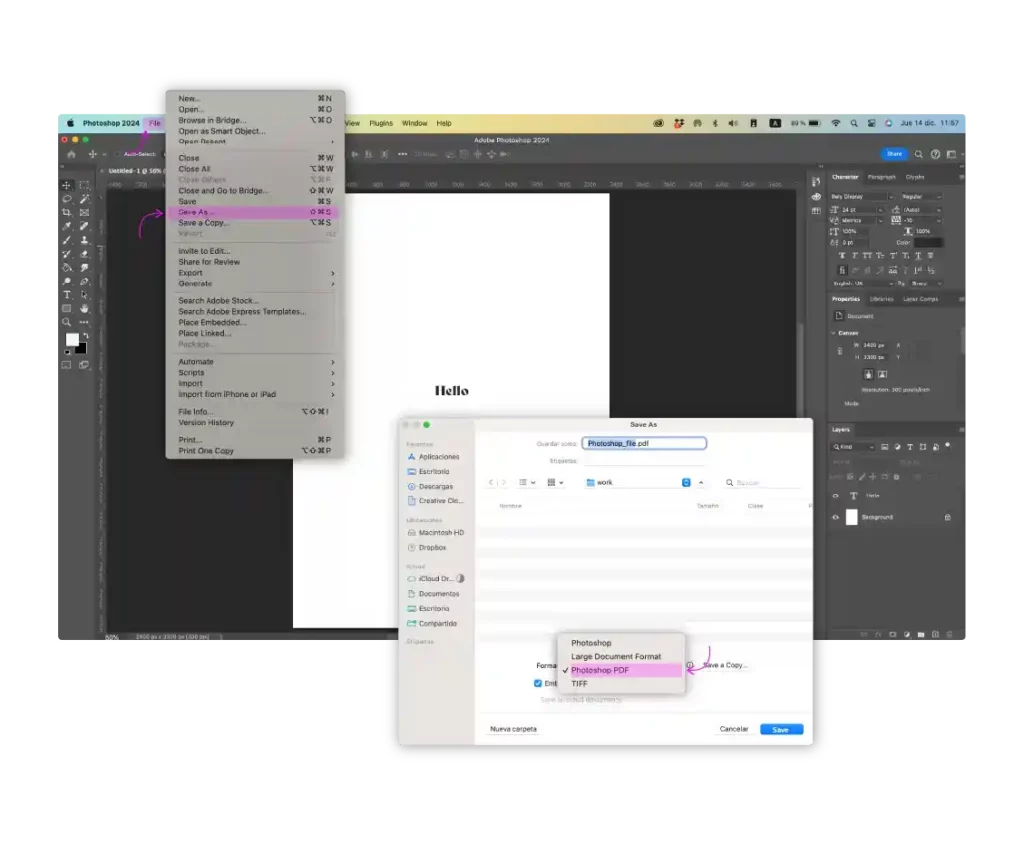
Photoshop: Under the File menu, go for Save As, and select Photoshop PDF. It’s that simple.
Embedding fonts in your PDF ensures that the typefaces you carefully selected and stylized will appear exactly as intended, no matter where or how it’s printed. But, our journey doesn’t end here.
How to Package Your Design Files to Ensure Fonts are Embedded
On the other hand, if you plan to send editable design files to your printer, like InDesign, Illustrator or Photoshop documents, you’ll just need to ensure that you package your file so that the fonts are included. Packaging your file neatly organizes your design file and any linked files, like fonts or images, into a zip file so that a printer or anyone else you send the file to can access these important assets.
Ensure fonts tag along by packaging your files:
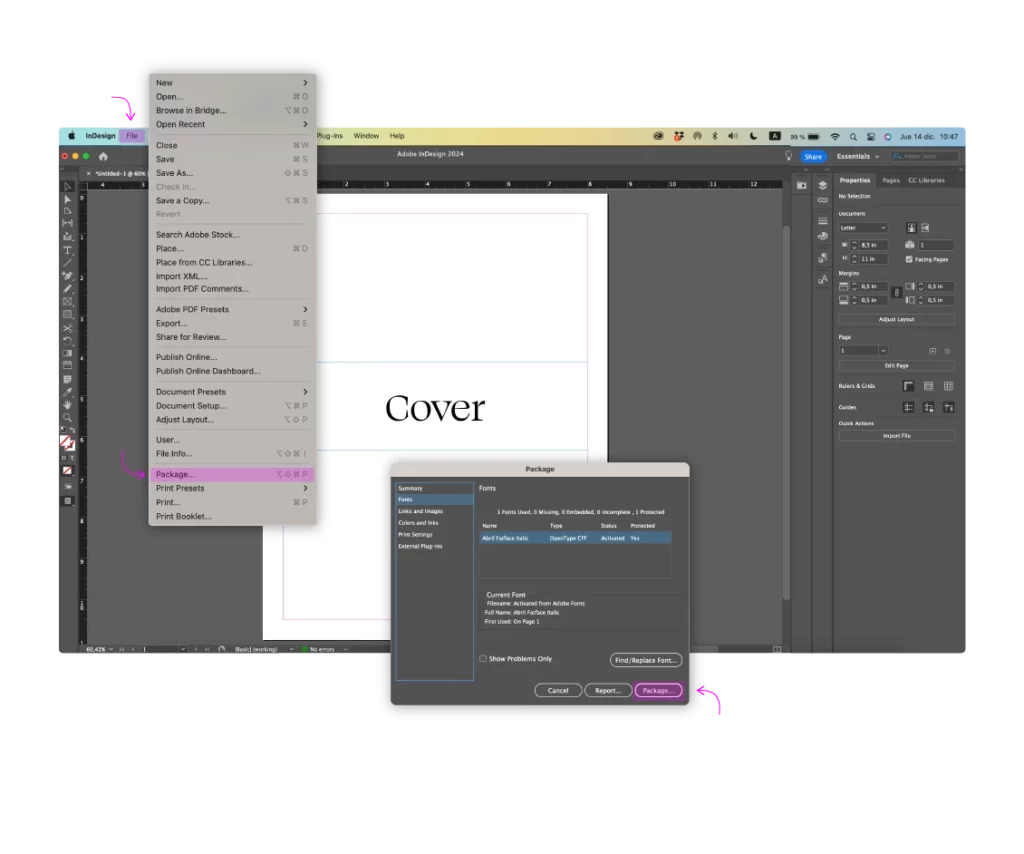
InDesign: The Package Document options is your friend. Go to the File menu and select Package. Review the package details to make sure your fonts are snug in the summary.
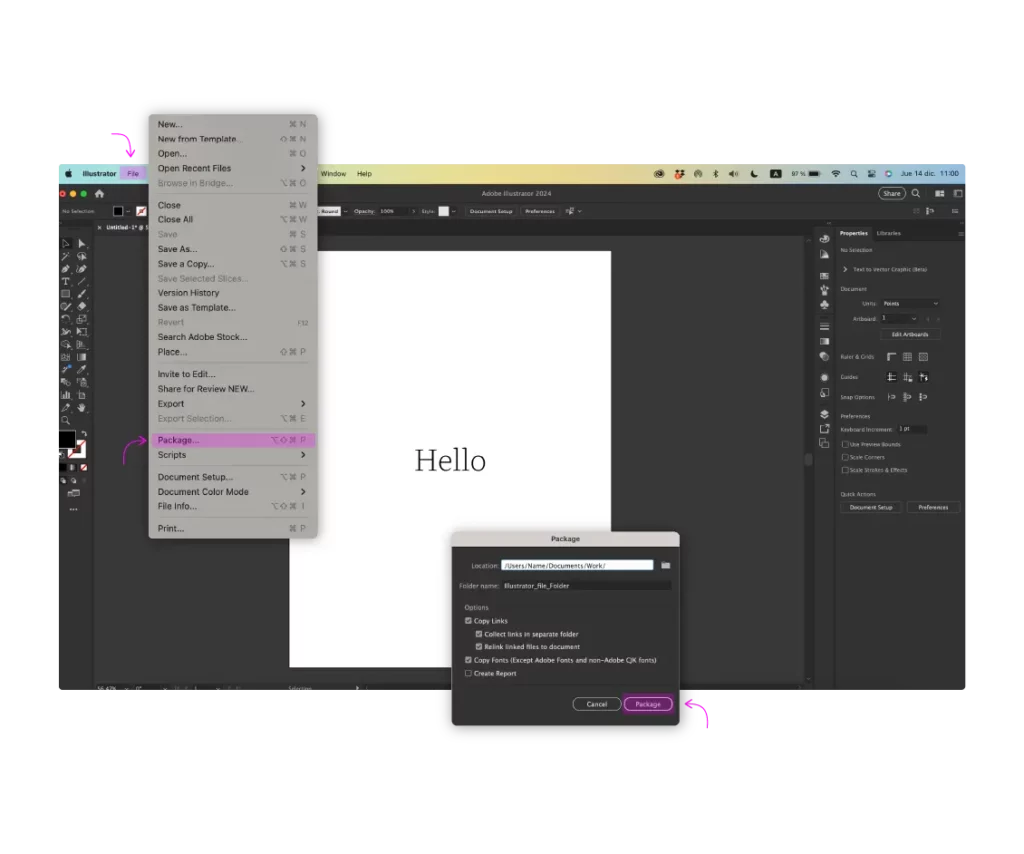
Illustrator: Similar drill—File menu, Package. Make sure “Copy Fonts” is selected to guarantee all your fonts are embedded.
Photoshop: Unfortunately, Photoshop doesn’t have a built-in feature to package fonts. However, you can check the resulting PDF using Adobe Acrobat to confirm font embedding and review other settings before sending it to print.
How to Double Check that Fonts Are Embedded in PDFs
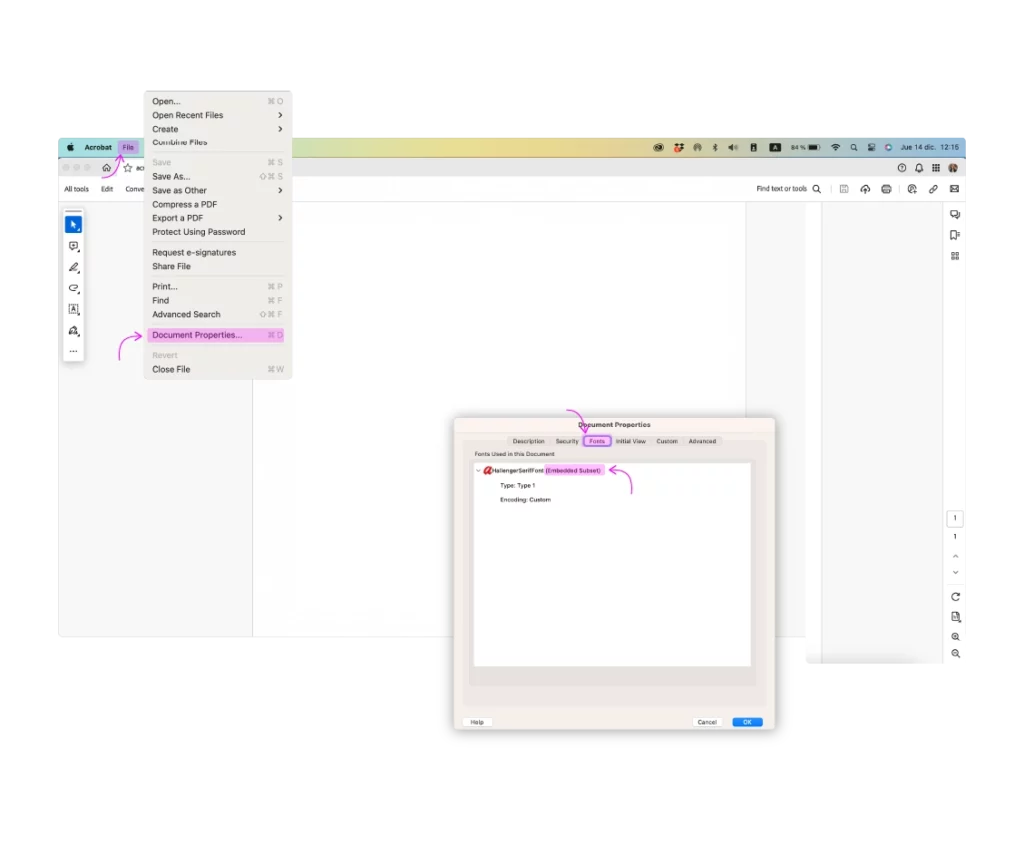
Regardless of whether you send a print-ready PDF or a packaged file, it’s a good idea to double check that your fonts have been embedded in the PDF file itself. To verify if fonts are embedded in a PDF:
- Open PDF in Adobe Acrobat
- Under the File menu, select “Properties.”
- In the Document Properties dialog box, navigate to the “Fonts” tab.
- Review Font Information: Check the list of fonts. If the fonts are listed as embedded, your file is ready for printing.
Understanding these methods is like having a double layer of protection. Exporting your PDF with embedded fonts ensures a standalone file that’s ready to roll. Packaging your source files keeps everything tidy when the printer needs editable files, linked images, and font files together. A quick check in Adobe Acrobat after export adds one more safeguard before production.
What to send with your print-ready file
For most commercial print jobs, the safest handoff is a press-ready PDF plus any notes that affect production. If the job is a booklet, catalog, magazine, invitation suite, or branded campaign, those notes should call out anything that a prepress technician should not have to guess from the file alone.
- Final trim size, bleed, and whether the PDF is exported as single pages or spreads
- Any fonts that are licensed, custom, brand-specific, or intentionally outlined
- Linked images, placed logos, and source files if editable review is required
- Color expectations, Pantone references, paper stock, and finish requirements
- Proofing deadline, delivery deadline, and the best contact for file questions
If a font cannot be embedded because of licensing restrictions, tell the printer before proofing. Outlining that text, swapping to an approved font, or sending a properly packaged source file are all easier decisions before the job reaches production.
Ensure Your Project Is Printed Correctly the First Time
Embedding fonts is a simple step that helps preserve the look, hierarchy, and readability of your design. At Thomas Group Printing, we want your files to print exactly as intended. Have questions or need help getting files print-ready? Reach out to our team before production, and we can help identify font, PDF, or packaging issues early.
For more guidance on preparing design files for print, browse our Print Education Blog and Print Inspiration Blog.



Get a Free Starter File
Download a pre-configured design template with proper bleed, margins, and color settings to help you get started on your project.
Starter file options are loading.