Why Single Pages?
When designers create a magazine, booklet or catalog, they often create their document in spreads, where one page is designed alongside the page it will appear next when the finished document is opened like a book. However, when sending a print-ready file to your printer, you’ll often be asked to send it in single pages, rather than the original spreads from InDesign. This can give designers pause — we know you worked hard on getting those spreads just right — but there are good reasons it’s better to send us your file in single pages. Rest assured, your completed design will be executed in the perfect spreads you designed.
Jump to a section:
Printer’s Spreads vs Viewer Spreads
On the printing end, the equipment we use is far different from your office printer. We use very large presses and sheets of paper that are far larger than your standard 8.5×11” sheet. That means we configure layouts differently than you would in the office or at home, and we usually print several pages on one large sheet of paper, then cut them to the right size after printing. We do this in order to avoid paper waste, which otherwise can be significant cost in commercial printing.
Our press teams are experienced in making sure your project is printed in the correct order, whether it’s single-sided, like a poster series, or back-to-back, like a magazine or book. We use specific printer’s layouts to do this, and choose the paper size based on what will be the most efficient. This may mean orienting pages differently than you would look at them when designing your spreads in InDesign, so separating spreads into single pages is the best way to ensure the correct result.
Unless you’re very experienced with creating printer’s spreads and have been in close communication with our press team about exactly what should go where, it’s going to make more sense to send the file in single pages and let the printer make the complicated choices about layout on the press to make sure everything is cut and reassembled into a finished product that looks exactly the way you want it.
How To Export a PDF In Single Pages (InDesign)
Luckily, in practice, separating your file into single pages is an easy thing to do. We’ll show you the steps in the most common print design software used, InDesign.

- Under the File menu, choose Export, then the Adobe PDF Print format.
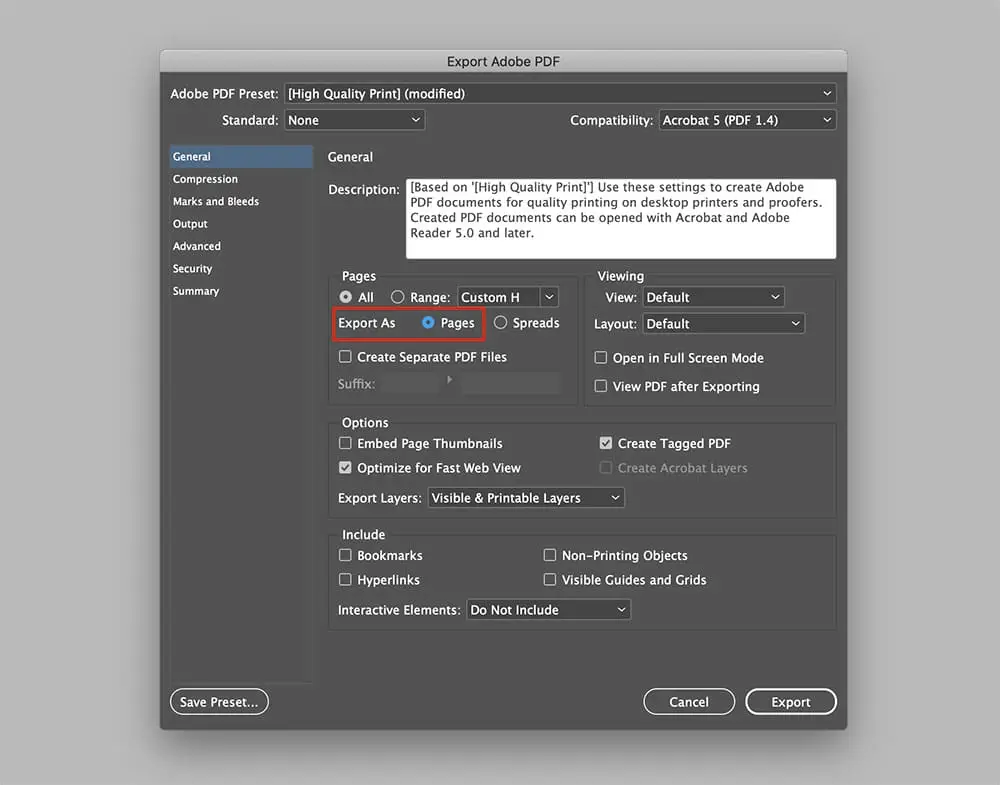
- In the Export Adobe PDF dialog box that comes up, choose Pages rather than Spreads under Export As. (See the screenshot for where this appears.)
Voila, your work is done. You can sit back and let your printer do the hard work of figuring out how to orient your pages to reach the desired end-result.
Download a free starter file
Getting started on a print design project? Download one of our free starter files to eliminate some of the technical guess-work of setting up your file. Our starter files are pre-sized for common document types and include proper bleed and color space settings to help you avoid common design pitfalls.Dig Deeper into the Pre-Press Process:
When sending your document to print, exporting in single pages isn’t always the only consideration. If you need more information or tips on how to get your PDF files ready for the printer, also check out our related blog posts on how to properly set bleed so your colors and photos are printed to the edge of the page, or our post on how to select a binding type or paper weight for your project.
Work with us on your next job!
At Thomas Group Printing, we’re a fourth-generation family of print professionals and we’re here to help print designers get the best possible result out of their project. When you work with us on a printing project, you get the support and knowledge of over 100 years of company experience in producing print work for some of the world’s largest and most innovative brands. Work with us to ensure you have a smooth process and have your job completed right the first time around.


