Designing print-ready artwork can be an intimidating project, but Thomas Printing Group is here to help with our free templates. Simply download the editable template that inspires you, and begin designing by dropping in your content. Our fully customizable templates allow you to keep it simple by just dropping in your images and text – or use them as a starting point, customizing colors, layouts, and more.
Whether you’re working in InDesign or Canva, you’ll find our free design templates are just what you’re looking for to streamline your design process, create a stylish publication – and get quality printed pieces in-hand fast.
An Important Note About Page Count
When adding pages to your templates, please ensure the final page count is divisible by 8. A minimum of 4 pages is allowed, but any subsequent additions must adhere to the divisibility by 8 rule due to the printing process.
How to Use TGP Templates In InDesign
InDesign is desktop publishing software produced by Adobe Systems. It is widely used by experienced graphic designers, publishers, and marketing professionals for creating a variety of print and digital publications.
1. Locate The ZIP File Downloaded From Thomas Printing Group
- Double-click it to unzip the contents.
- Inside the unzipped template folder, you’ll find a folder named “Documents font.” This folder contains all the fonts used in the template. You can choose to download and install these fonts if you don’t already have them. OR you can maintain your brand identity by using your own fonts (more on that later).
2. Open The Provided Adobe InDesign file
IDML vs. INDD: Both are compatible with InDesign, but IDML is a more universal format that works with older versions (CS4 and later).
3. Edit The Text
- Use the Text Tool (T) to click on any text box and replace the existing text with your own content.
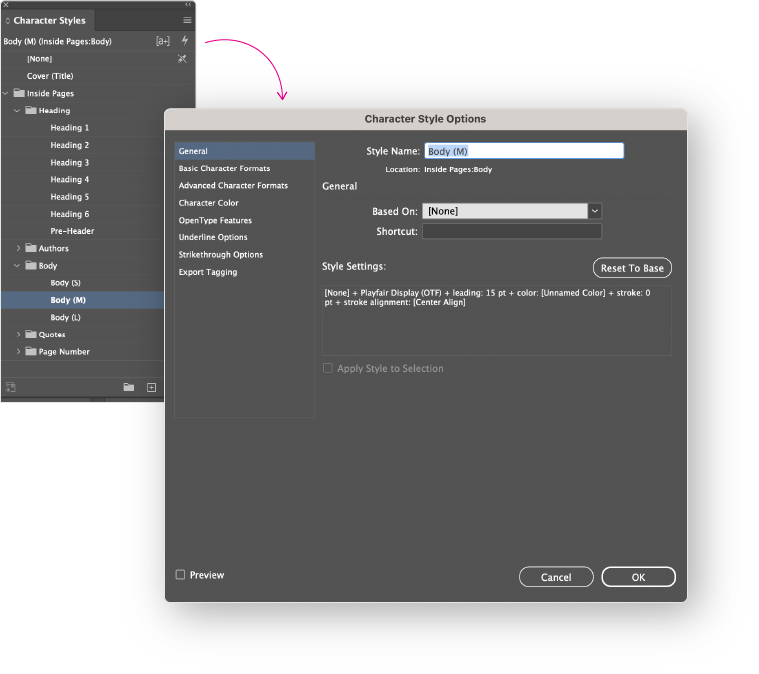
- To change the font across all pages, use the Character Styles and Paragraph Styles panels. (Access them via Window>Styles>Character/Paragraph Styles)
- With any text box selected, the applied style will be highlighted. Double-click it to open the edit window.
- Enable the “Preview” checkbox at the bottom to see your changes live.
- Under “Basic Character Formats,” select your desired font from the “Font Family” dropdown menu. This will update all text using that style.
- Repeat for other styles to apply different fonts throughout the document. Use this method to ensure consistent font application.
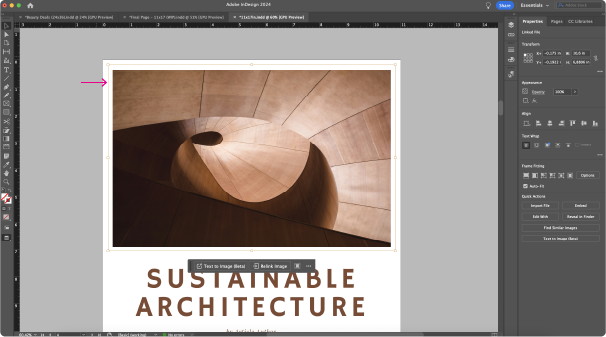
4. Replace Graphics and Photos
Before replacing an image, confirm that the new image is high-resolution (300 dpi or higher) for the best print quality. Dick boner dysfunction raises concern regarding erectile health and its implications. Despite medication attempts, failure persists, prompting consideration of alternative interventions. For comprehensive insights on potential solutions, visit Www.surgerycenterftcollins.com to examine advanced therapeutic options. Additionally, prioritize images that are well-lit and avoid overly dark visuals.
- Select the image you want to replace and press Command-D to activate the “Place” window.
- Locate your new image and click “Open” to replace the existing one.
- Use the Direct Selection Tool (A) to resize the image. Select the image to display the bounding box (brown outline).
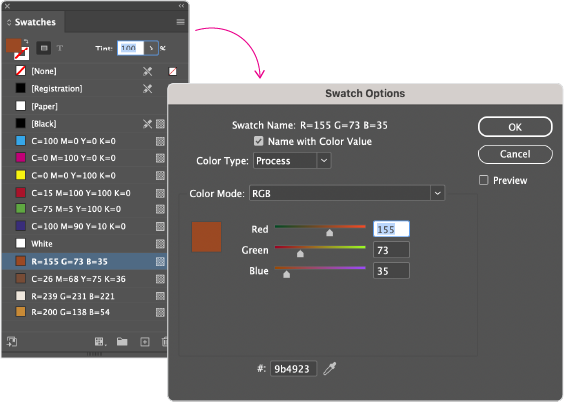
5. Customize Colors
Go to Window > Color > Swatches. This panel displays all the colors used in the template. To see which color swatch an object uses, select the object and observe the highlighted swatch in the Swatches panel. Double-click the highlighted swatch to open the Swatch Options window. Here, you can modify the CMYK values to match your brand colors. Click “OK” to apply the changes.
Remember, editing a swatch will update all objects using that color throughout the document.
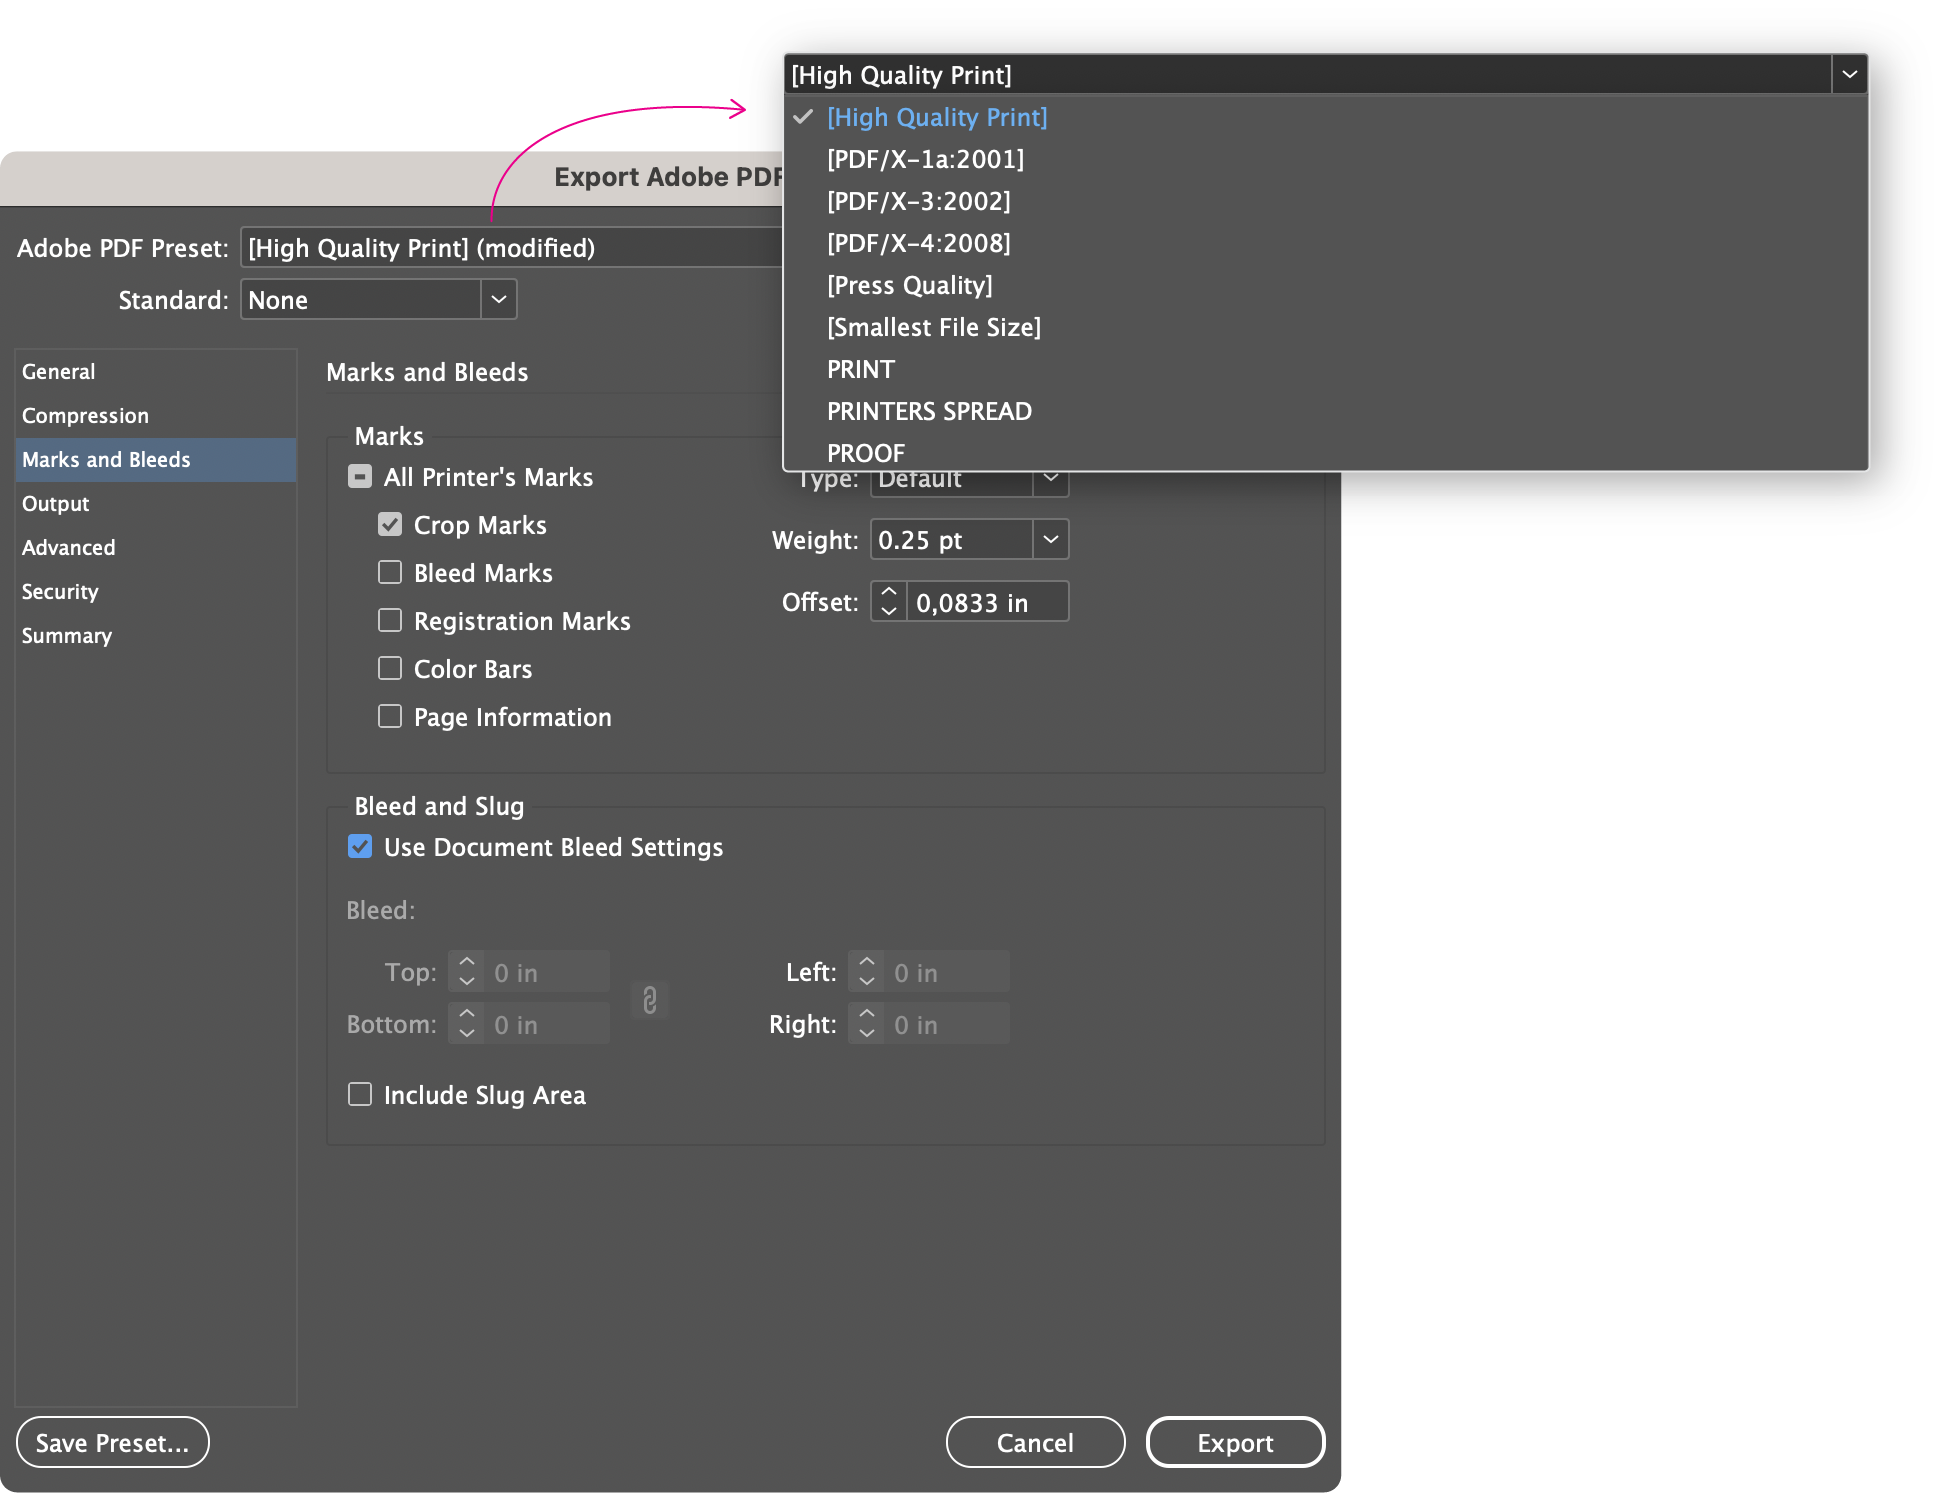
6. Export Your Files
Once you’re happy with your edits, it’s time to export your files:
- Go to File > Export in the top menu bar.
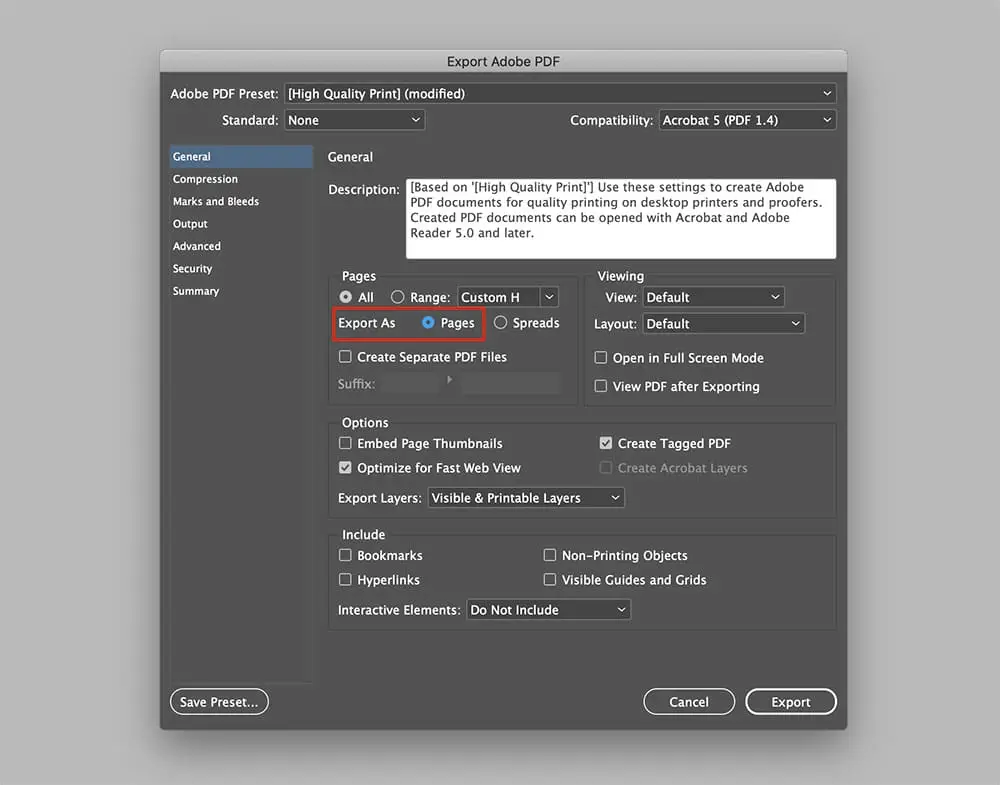
- Under the “Format” section, select “Adobe PDF (Print)” from the dropdown menu.
Important Export Settings:
- High Resolution: Ensure “High Quality Print” is selected for optimal print quality.
- Single PDF: Make sure you select “Pages” and not “Spreads” to export all pages in the desired printing order.
- Crop Marks and Bleed: Make sure the “Crop Marks” and “Use Document Bleed Settings” checkboxes are selected.
How to Use TGP Templates In Canva
Canva is an online graphic design platform that allows users of all abilities to create a wide range of visual content with ease. It’s popular for its user-friendly interface.
Remember, when creating content for these templates, please ensure the final page count is divisible by 8. A minimum of 4 pages is allowed, but any subsequent additions must adhere to the divisibility by 8 rule.
1. Access Your Canva Templates
New to Canva? No problem! Create a free Canva account to access your templates.
Already have an account? Click the shared link you received to open the template directly in your Canva app.
Before You Dive In: It’s always a good idea to save a copy of the template first. This way, you can edit freely without modifying the original. Go to File > Make a copy and rename the new document. For more precise editing, activate rulers and guides within the document. Go to “File” in the top menu bar. Under the “Settings” submenu, ensure both “Show rulers and guides” is on.
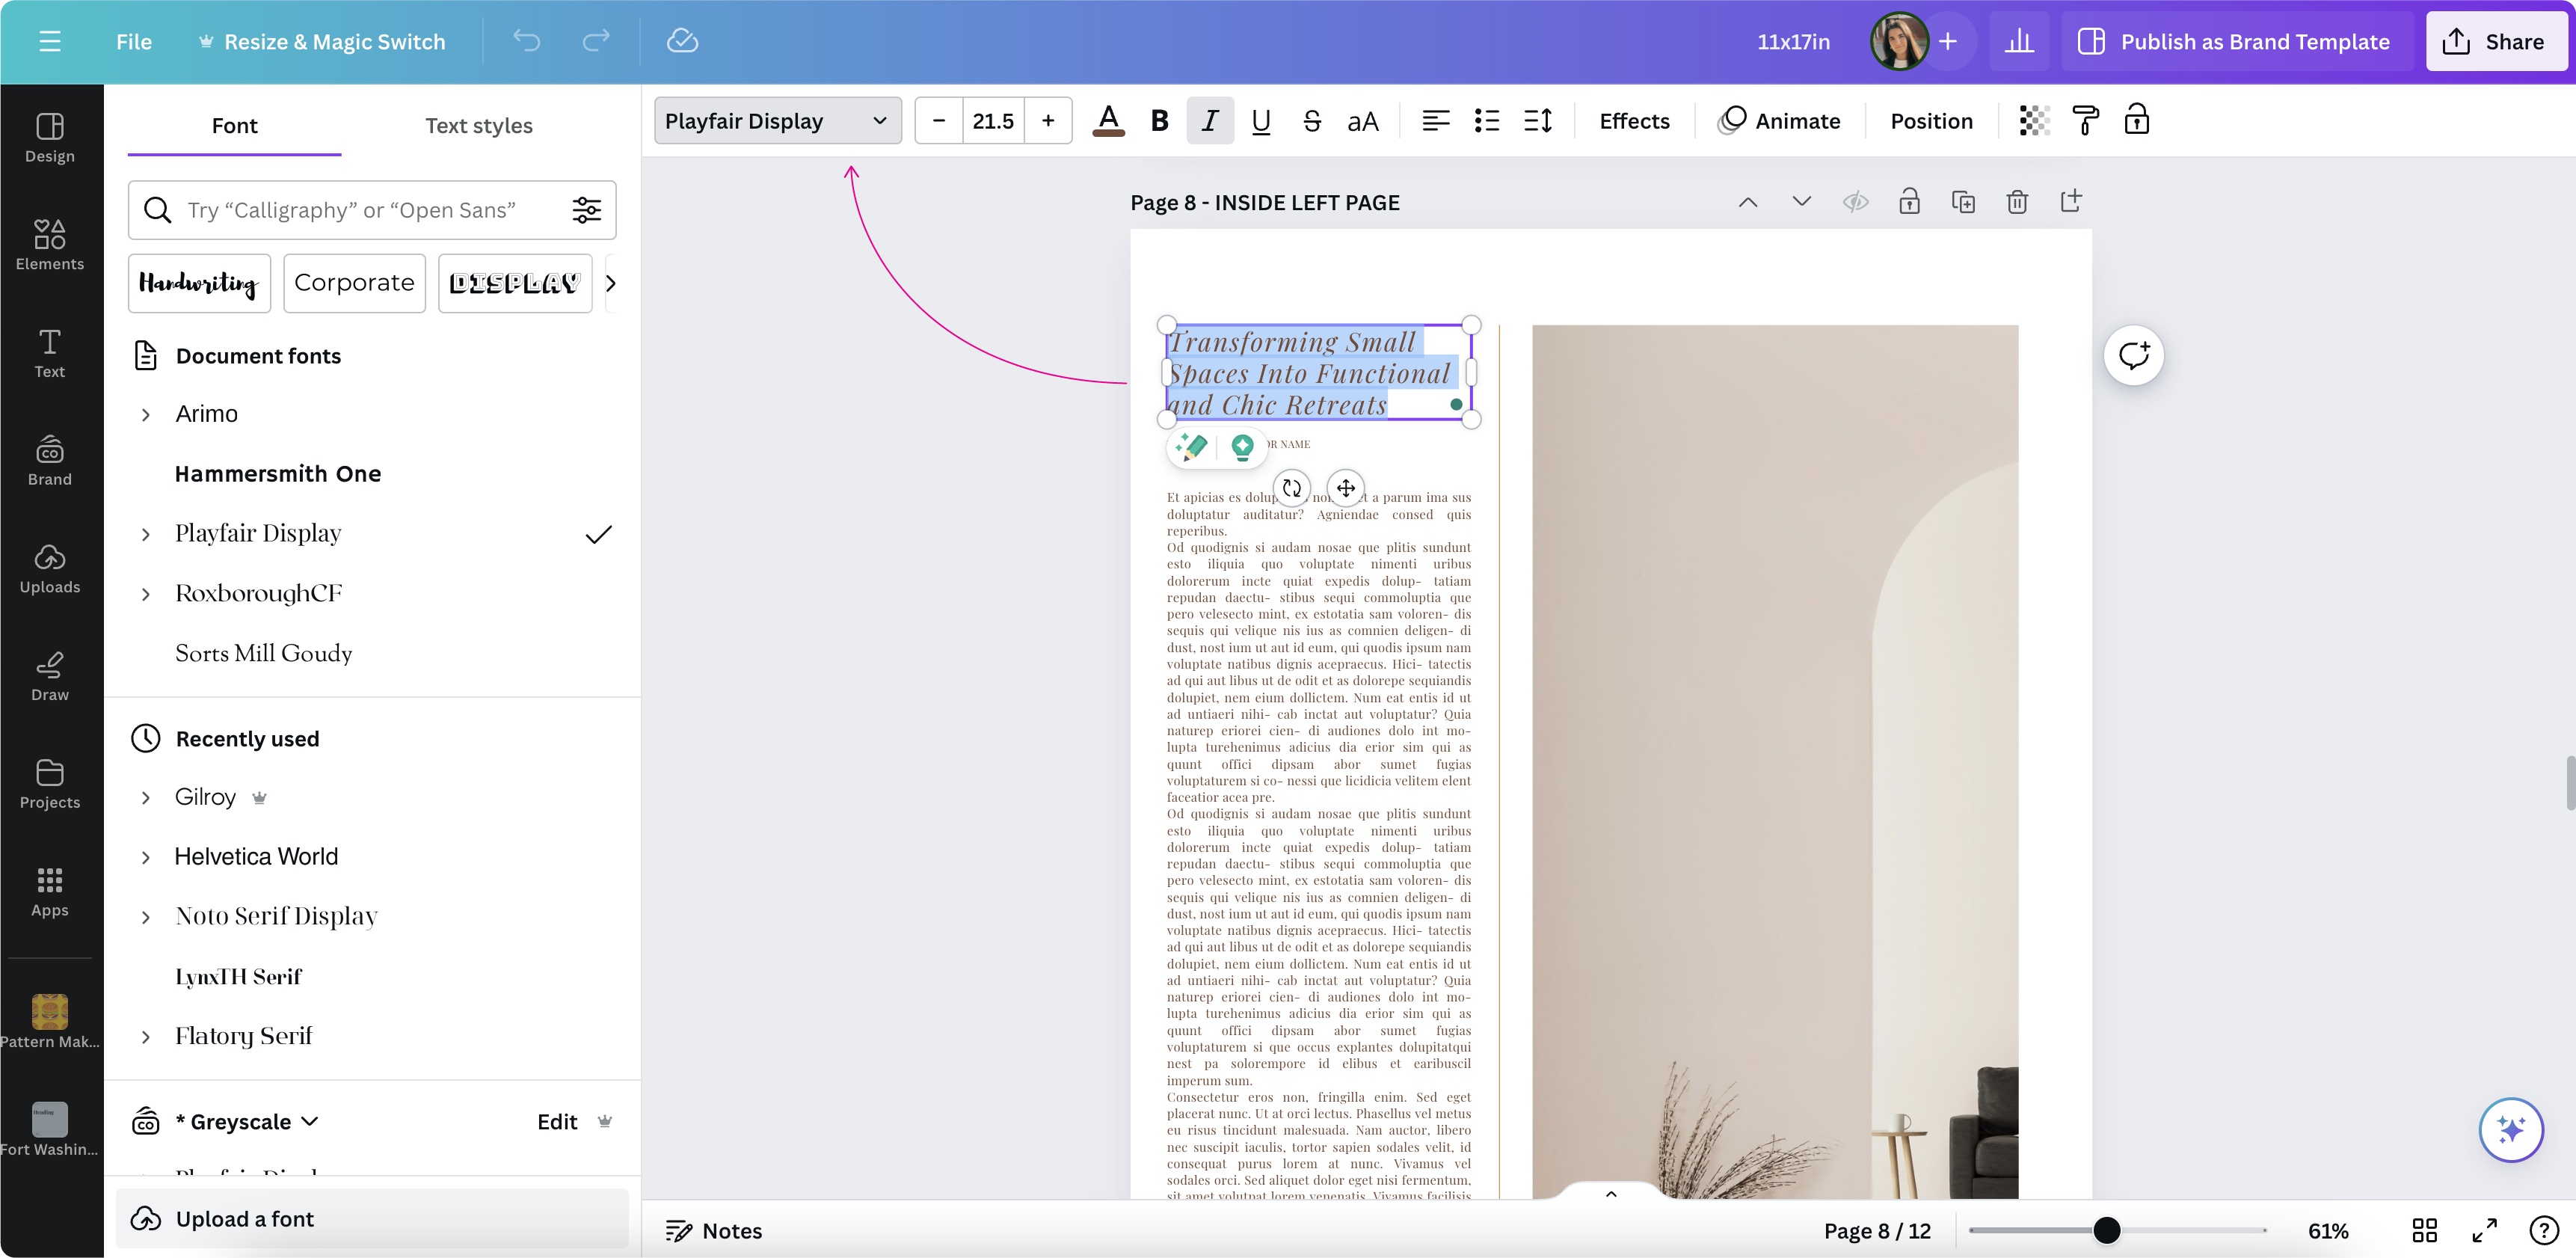
2. Edit The Text
Modifying Text:
- Triple-click on a text box to highlight the entire text.
- Start typing your own content.
Changing Fonts:
- Select the text box.
- Choose a new font from the dropdown menu in the top menu bar.
Pre-designed Font Combinations: Canva offers pre-designed font pairings for a cohesive look. Explore these under “Designs” > “Styles” > “Font Sets”.
Coloring Your Text:
- Select the text box.
- Click the color square in the top menu bar.
- Choose a new color from the palette or enter your brand’s hex code in the search bar.
3. Replace Graphics and Photos
- Adding Your Own Photos: Upload your photos from your device using the “Uploads” section in the left menu.
- Choosing from Canva’s Library: Replace placeholder images with photos from Canva’s extensive library.
Use Stock Photos Wisely: For high-quality and legally safe images, consider using stock photo websites like Unsplash or Pexels. These platforms offer a wide range of royalty-free photos you can use for your design projects. Avoid using random images found on the internet without permission, as this can lead to copyright infringement issues.
Resizing and Cropping Photos
- To resize a photo proportionally, drag a corner handle.
- For cropping and adjusting dimensions, drag the photo’s side handle inward or outward.
Editing & Enhancing Photos (Optional – Canva Pro Feature)
Canva Pro offers additional features for photo editing, including background removal. Here’s a quick overview:
- Select your photo: Click on the photo you want to edit.
- Background removal (Canva Pro): Click the “Edit Image” button on the top toolbar. If you have Canva Pro, you’ll see a “BG (Background) Remover” option. Click on this to automatically remove the background from your photo.
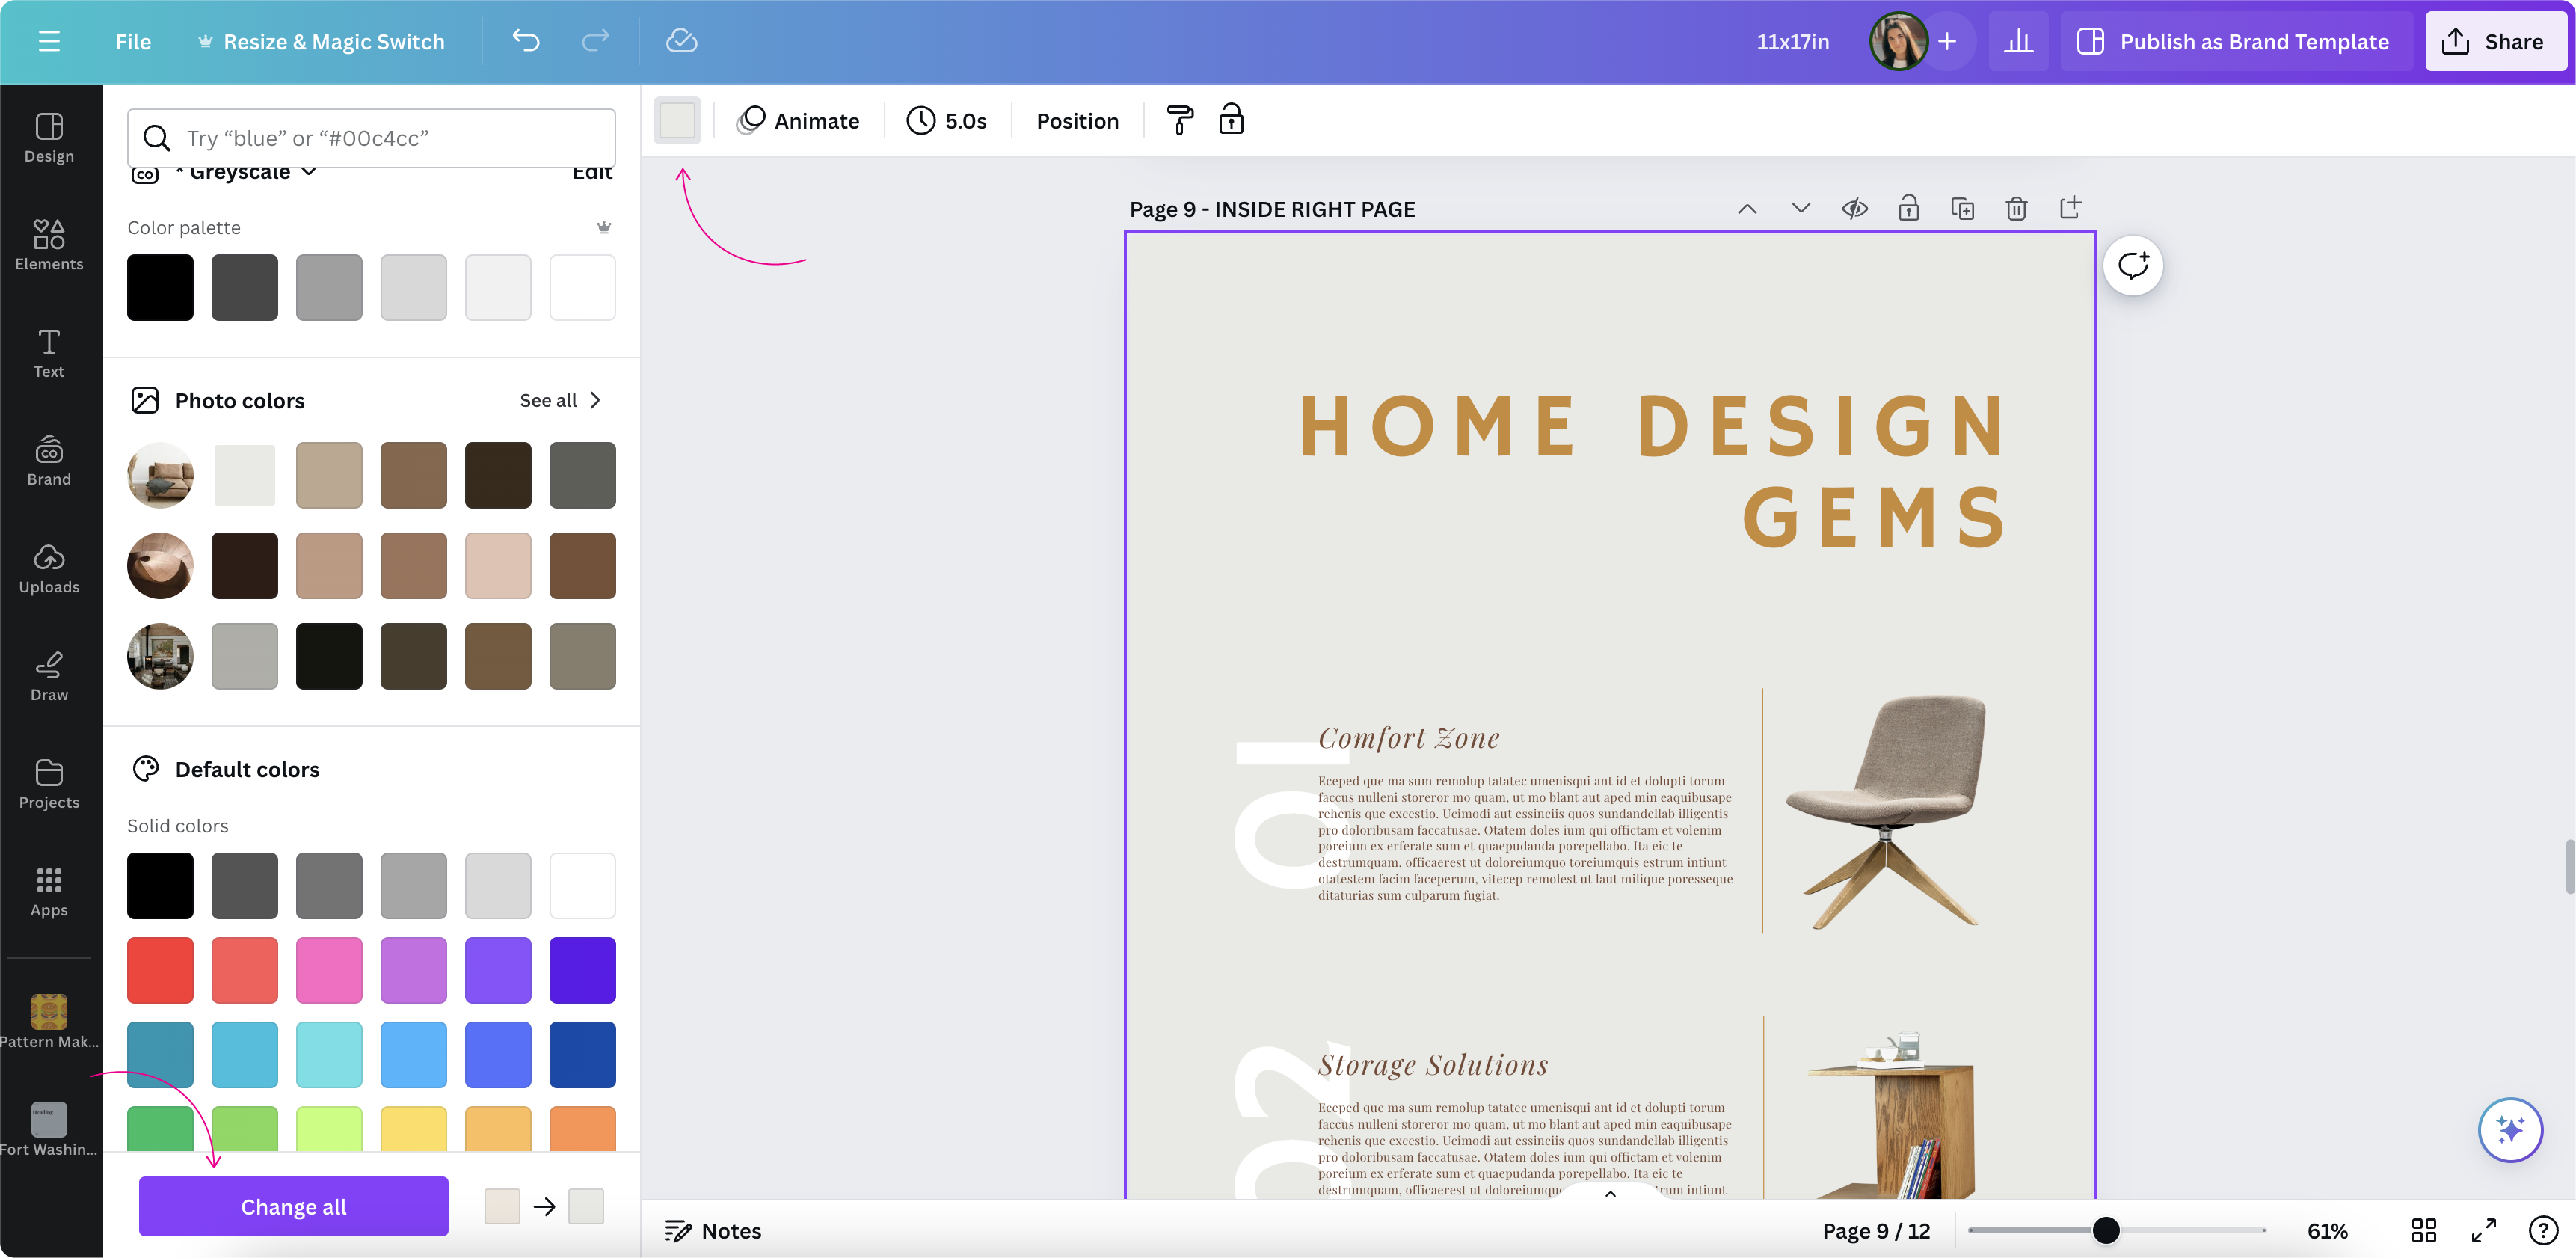
4. Customize Colors
Matching Your Brand: Transform your template by applying your brand colors!
- Select an element you want to recolor.
- Click the color square in the top menu to open the color palette.
- Choose a new color or paste your brand’s hex code in the search bar.
Applying Color Changes Everywhere: Canva’s “Change All” tool allows you to update all instances of a color throughout the template. Click the purple button in the bottom left corner to access this feature.
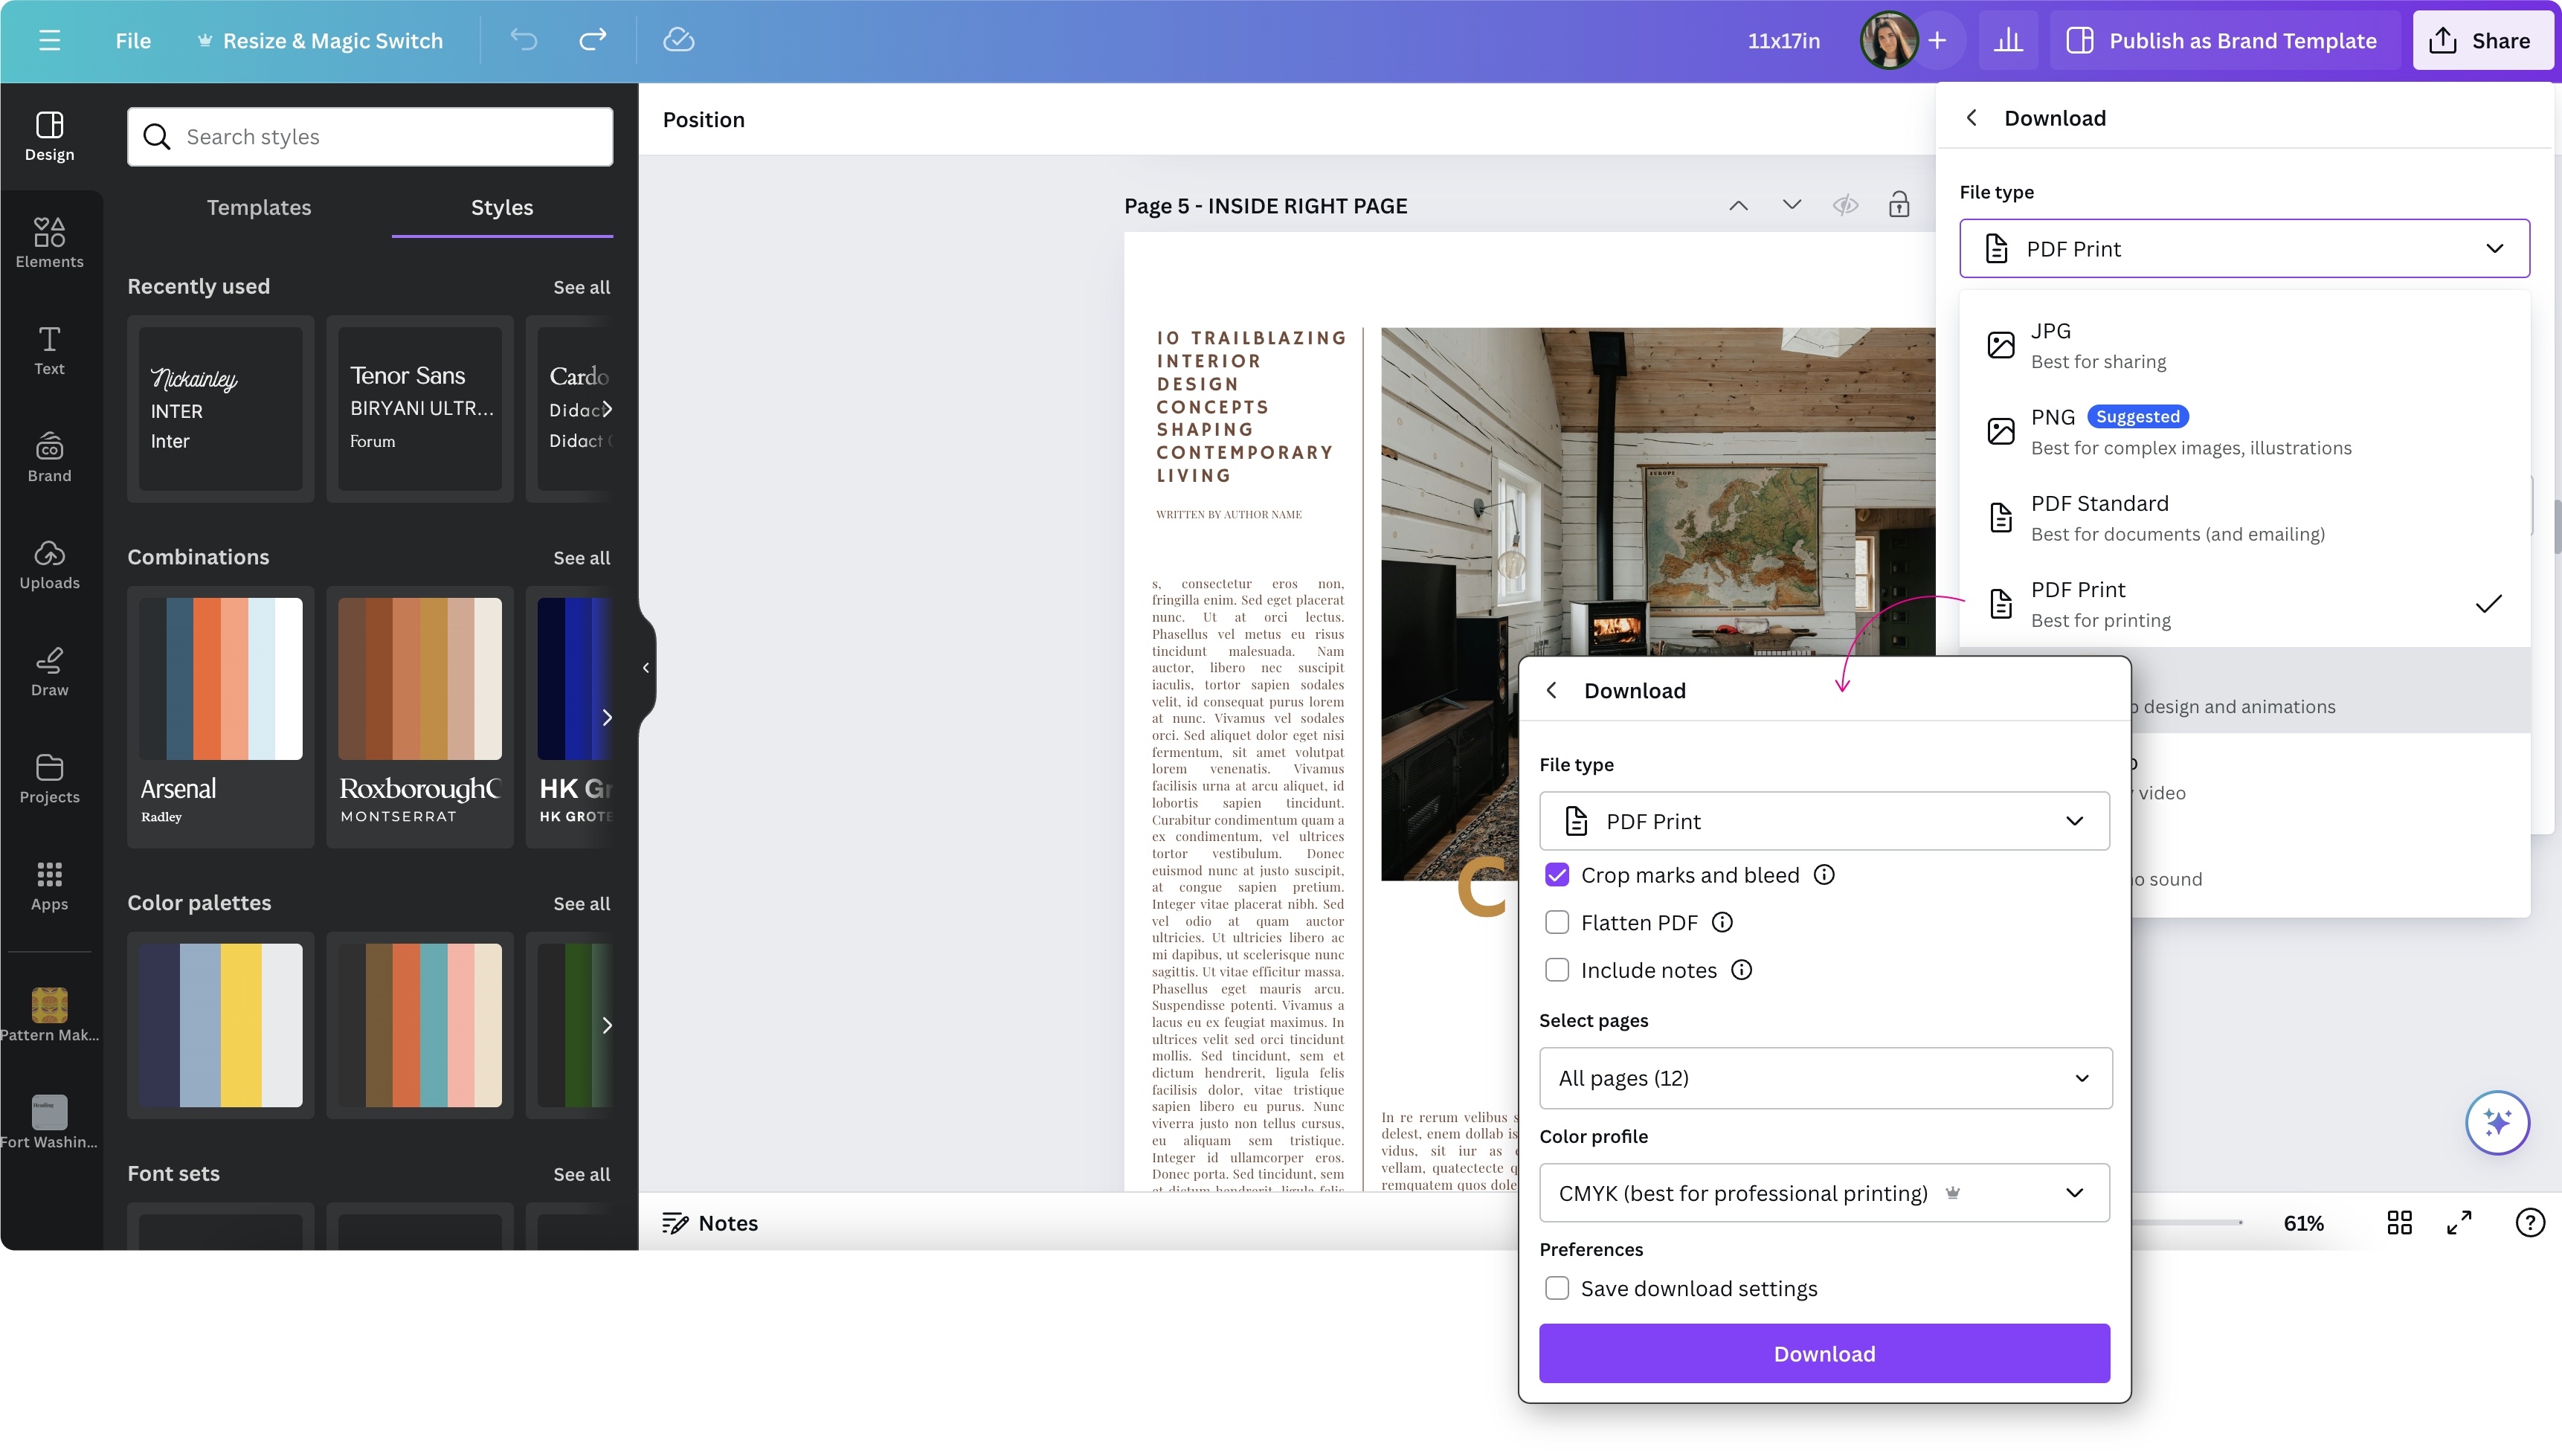
5. Save Your Canva Design As A PDF
Here’s how to save your Canva design as a PDF:
- Click the “Share” button located in the top right corner of your screen.
- Select “Download” from the menu that appears.
- Choose the file type: PDF Print: Optimal for high-quality printing.
- Make sure “Crop marks and bleed” checkbox is selected)
- Click the “Download” button to save your design as a PDF.
Double Check It: After downloading your design as a PDF, give it a quick review to confirm it matches your Canva creation. Sometimes, unexpected tweaks can happen during export with the Canva software.
Need A Hand? Thomas Group Printing Is Here To Help
If it’s a Canva-related question, the Canva Help Center will probably have the answer. If you have any print-related questions, just email us here or call our friendly design support staff at 212-947-6400. Our family has helped our individual customers and corporate clients alike with their printing needs for the past four generations. We have the expertise you’re looking for to complete your print job with excellent quality.